🤓 The 2026 Local Search Ranking Factors are here!! Check out the report!

Welcome to part three of “A Beginner’s Guide to Technical SEO For Local Businesses”. In this post we’re going to cover site speed, image optimizations, crawling and indexing, broken links, redirects and more. You can review part one here and review part two here which discuss keyword targeting, URL structure, duplicate content and Schema.org.
Another super important thing for local businesses is their sites mobile speed. Many times their customers and potential customers are out and about or sitting on their couch browsing their phone when looking for their services.
In 2016, mobile searches officially surpassed desktop. One study found that 56% of mobile searches done on the go have local intent.
Mobile phones have a much slower download speed compared to desktop devices. Because of that, websites that are already slower will have an even harder time loading quickly on a mobile device.
How does this affect local businesses?
“The average bounce rate for pages loading within 2 seconds is 9%. As soon as the page load time surpasses 3 seconds, the bounce rate soars, to 38% by the time it hits 5 seconds!” This will also have a negative effect on conversion rates.
Reference: https://royal.pingdom.com/page-load-time-really-affect-bounce-rate/
So what to do? First you’ll want to test your site’s speed. Using Google’s page speed tool is a good idea since we want to make Google happy. I also use GTmetrix and WebPageTest.org to get even more helpful data.
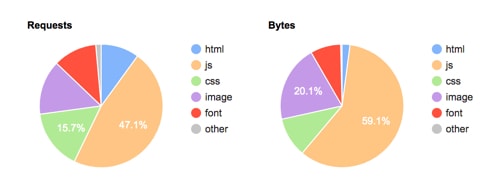
WebPageTest.org shows you a breakdown of your site content, which can help you identify which files are taking up your resources. In the example below, there are a lot of JavaScript files; I’d review all the JS files to see if of them any are unnecessary and can be removed.
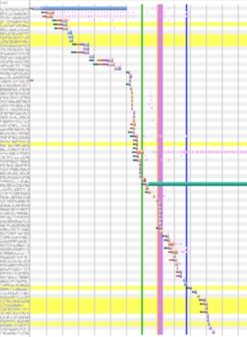
There’s also the beautiful waterfall view that can show you which resources are taking the longest to load.
Unfortunately, working on site speed optimization is not for beginners. It’s easy to break things on your site and is basically web development work. But here are some things you may be able to do on your own. Make sure your website is backed up before making any site speed changes.
Something I’ve noticed that has a big impact on site speed is the quality of your website hosting. If your are using the cheapest hosting you can find, then your site is probably hosted on a cheaper, slower server. I’d recommend upgrading to something around $30/mo or even VPS hosting. Review Signal is an awesome resource for comparing web hosting companies if you don’t know who to choose.
There are also many things you can do to your website to reduce file sizes and load files more efficiently. Here are some of my favorites.
WP Rocket: This plugin is great for caching, gzip compression, minifying and / or combining HTML, JS and CSS files, deferred JS loading, DNS prefetch and more!
WP Asset Cleanup: When you use plugins on your site, many of their assets (.CSS and .JS files) load on every page of your website instead of just the pages that they are needed on. For example, Contact Form 7’s assets may load on every page but it may only be needed on your contact page since that’s the only page with a Contact Form 7 form.
WP Asset CleanUp allows you to choose whether or not to load individual CSS or JS files on all or only specific pages of your site.
ShortPixel: This plugin can resize all your images in bulk, compress all your images in bulk, keep the original image files, restore original image files, replace all original images on pages with the compressed versions, serve WebP image formats and more! I have tried many image compression plugins and this one if my absolute favorites.
Keep in mind, you should manually resize images before uploading them to your site if possible, then use this plugin to compress your images in bulk.
In addition to resizing and compressing your images so that they load quickly, you can also optimize them for local search.
Two important aspects are:
The name of the image file is important because it helps tell search engines what your image is about. Usually, when you upload an image, the file name is something random like IMG080919.jpg.
Can you tell what this image is from reading the file name? Well Google can’t either.
Now take a look at skateboarder-fall-down-go-boom.jpg. Can you tell what this image is just from reading the file name? A short but descriptive file name can help users and more importantly search engines.
https://domain.com/wp-content/uploads/ac-repair-tampa.jpg
Alt text provides additional details about an image for both users and search engines. Alt text is used in two ways. If for some reason the image cannot be displayed, the alt text will show instead, giving users an idea of what the image is. See the example below.
More importantly, alt text is used by search engines. Google claims that they cannot read images and that they use alt text to try to understand what images are about.
<img src=”/wp-content/uploads/ac-repair-tampa.jpg” alt=”ac repairman fixes broken air conditioner in tampa florida”>
When it comes to technical SEO, making sure that search engines can crawl and index your site is #1 in importance. If your site can’t be crawled, it can’t be indexed and then people will never find it.
There isn’t a central registry of all web pages that exist anywhere (that we know of), so Google must constantly search for new pages and add them to its list of known pages. This process of discovery is called crawling.
Google uses a web crawler called Googlebot to crawl the internet. A web crawler is like a virtual robot or a spider. A web crawler is really just an automated program that crawls from one web page to the next.
For example, Googlebot will crawl /about-us/ and if there are any links on the /about-us/ page to other pages, then Googlebot will crawl those next.
Why does Googlebot do this? If Googlebot finds new content, it may suggest that it be indexed by Google.
After a page is discovered by Google, it tries to understand what the page is about and decides to add it to it’s “index”. Google’s index is just Google’s registry of all websites that they may want to show in their search results.
When you search on Google, you are not seeing all available websites that exist, you are only seeing websites Google has decided to add to their index of websites.
You will need to see if Google is able to crawl your site. You can do this a few different ways.
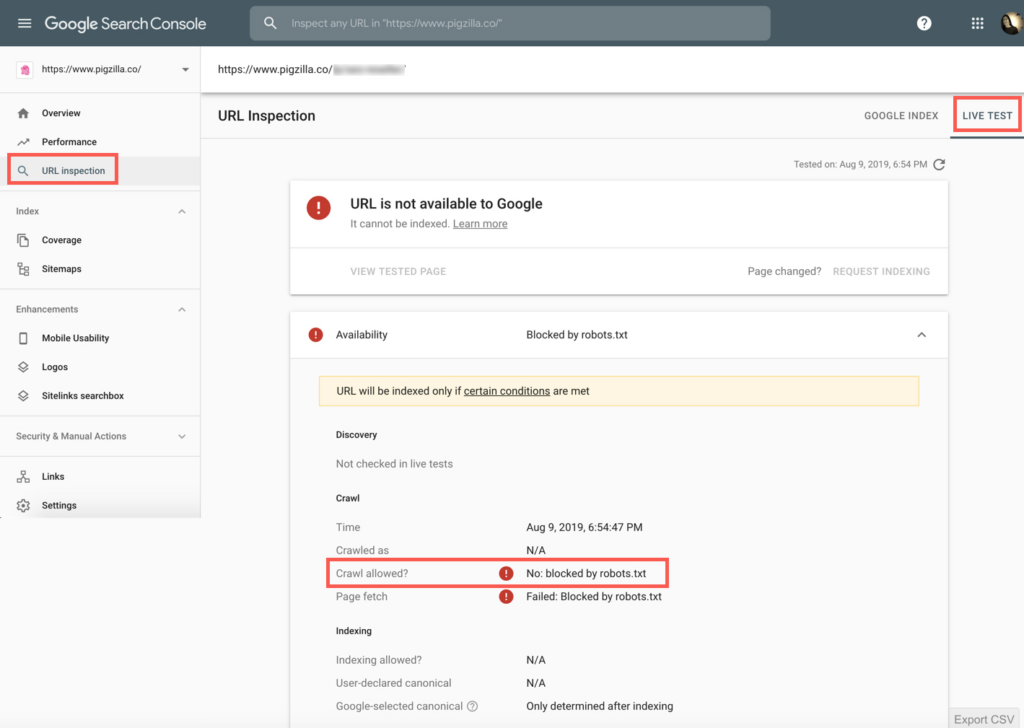
Sign into Google Search Console and navigate to the “URL Inspection” tab. Enter the URL you want to test and then click on the “Test Live URL” button.
See what it says besides “Crawl allowed?” If it says: “No: blocked by robots.txt” then Google can’t crawl this page.
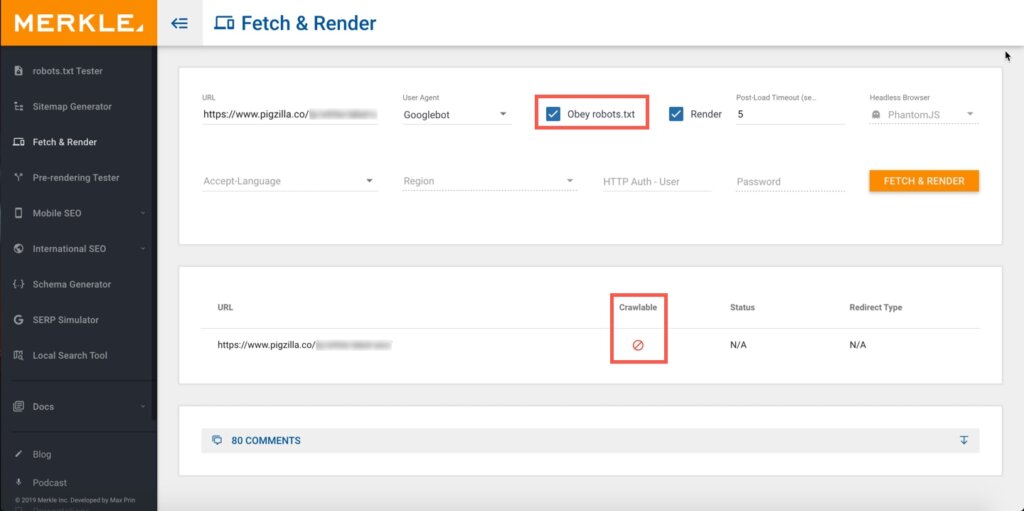
If you don’t have access to Google Search Console for some reason you can use this free Fetch & Render tool.
Make sure to check the “Obey robots.txt” box and click the “Fetch & Render” button. If the results show a “no symbol” like in the screenshot below, then Google is not able to crawl that page.
Many times the reason Google can’t crawl your site is because it’s being blocked from doing so in the robots.txt file.
To view this file for your site, simply add /robots.txt to the end of your home page URL.
Example: https://whitespark.ca/robots.txt
There are a lot of ways this file can be configured but to keep it simple I’ll cover the two basic ways.
If your robots.txt file looks like this it’s blocking all web crawlers from all content on your site.
User-agent: *
Disallow: /
If your robots.txt file looks like this it’s allowing all web crawlers access to all content on your site.
User-agent: *
Disallow:
To learn more about robots.txt files, check out this article.
After you have made sure Google can crawl your site, you’ll want to see if Google has indexed it or even has the permission to do so. You can do this a few different ways.
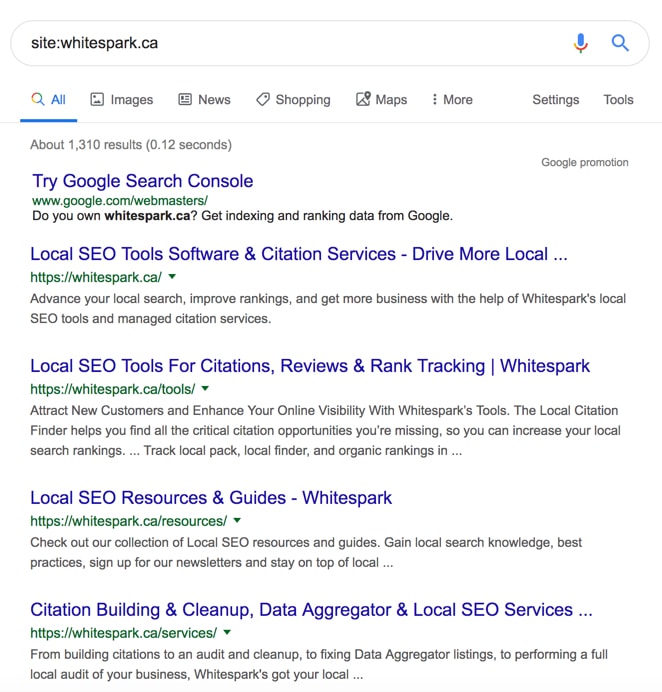
The quickest and easiest way to see if Google has indexed any of your site is to go to google.com and type in “site:domain.com” into the search bar. If you see any results then that means Google has indexed some or all of your pages.
Here’s what that would look like:
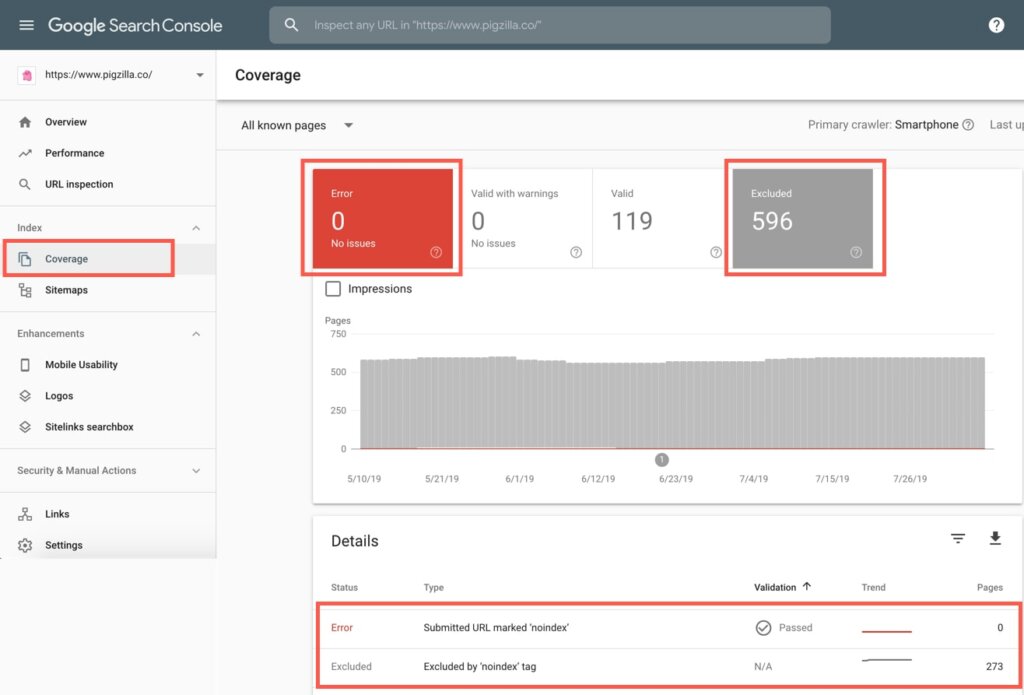
In Google Search Console go to the “Coverage” tab and select both the “Errors” and “Excluded” blocks. When you scroll down, if you see anything that says “noindex” this means Google is being told not to index those pages. Either on purpose or by accident.
You can check the meta robots tag on the page itself to see if it is allowed to be indexed by search engines.
If you are using Chrome, right click on the page and select “Inspect”. Then search for name=”robots”.
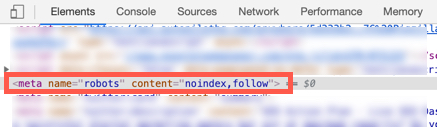
If you find no tag, then the page is allowed to be indexed.
If you find either of these tags, then the page in not allowed to be indexed.
<meta name=”robots” content=”noindex, follow”>
<meta name=”robots” content=”noindex, nofollow”>
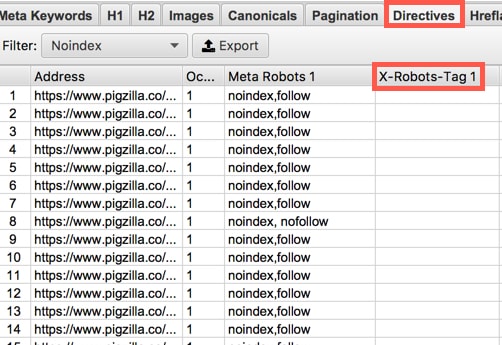
Another way you can see if pages are telling Google not to index them is by using a crawling software like ScreamingFrog as I mentioned before. You can crawl your site as Googlebot and check the “Directives” tab and look under the “Meta Robots” column. If any pages show the word “noindex” in the “Meta Robots” column then Google is being told not to index those pages.

This is probably going to happen way less often on small business websites but I’ll cover it just in case. Another way you can stop Google from indexing a page is by an X-Robots-Tag. With this you can use robot.txt directives in the header of an HTTP response.
You can see if pages have an X-Robots-Tag by using a crawling software like ScreamingFrog. You can crawl your site as Googlebot and check the “Directives” tab and look under the “X-Robots-Tag” column.
You can see if a page has an X-Robots-Tag by looking at the HTTP headers of the page. If you are using Chrome, right click and select “Inspect”. Then click on the “Network” tab and reload the page. Select the HTTP request of the page and look for a X-Robots-Tag.
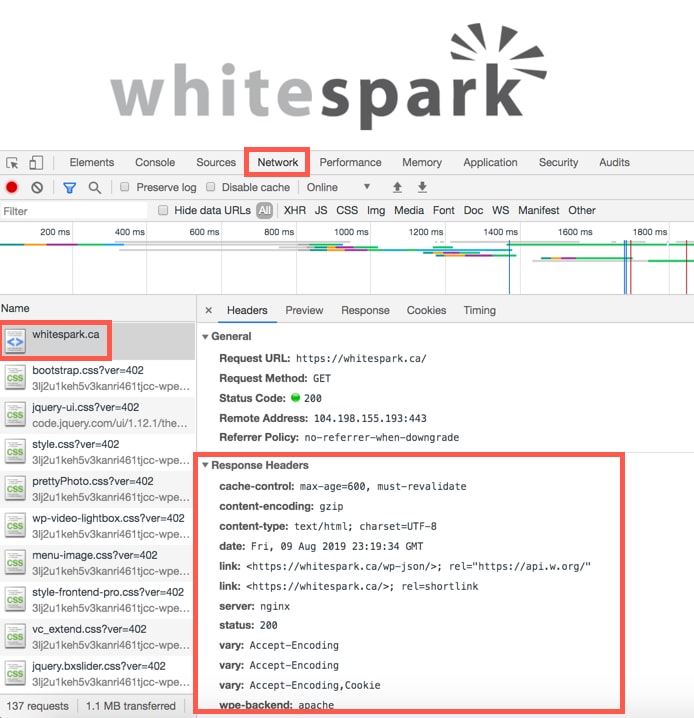
If you don’t see one then there obviously isn’t one. In the example above, there is none.
If you see something like this below, then search engines won’t index this page.
HTTP/1.1 200 OK
Date: Tue, 31 May 2019 21:42:43 GMT
(…)
X-Robots-Tag: noindex
(…)
HTTP/1.1 200 OK
Date: Tue, 31 May 2019 21:42:43 GMT
(…)
X-Robots-Tag: noindex, nofollow
(…)
This is a very common mistake that I wanted to point out. Sometimes people think that if they block a page from being crawled in the robots.txt that Google won’t index it. That is not true.
Here are a couple of comments from Google that explain it very well.
“Be careful about disallowing search engines from crawling your pages. Using the robots.txt protocol on your site can stop Google from crawling your pages, but it may not always prevent them from being indexed. For example, Google may index your page if we discover it by following a link from someone else’s site. To display it in search results, Google will need to display a title of some kind and because we won’t have access to any of your page content, we will rely on off-page content such as anchor text from other sites. (To truly block a URL from being indexed, you can use the “noindex” directive.)”
Reference: https://support.google.com/webmasters/answer/35624?hl=en
“Important! For the noindex directive to be effective, the page must not be blocked by a robots.txt file. If the page is blocked by a robots.txt file, the crawler will never see the noindex directive, and the page can still appear in search results, for example if other pages link to it.”
Reference: https://support.google.com/webmasters/answer/93710?hl=en
If you have “confirmation” pages that users reach only after they have completed an important action, it’s a best practice to noindex these pages. Why?
Let’s say each time someone reaches the /thank-you/ page, you count that as a goal completion in Google Analytics. If a user finds that page in Google’s search results and visits it, that visit would count as a conversion in Google Analytics. And if you multiply that by many unique searchers, these visits would now all count as conversions in Google Analytics and severely skew your conversion data.
For this reason, it’s recommended that you noindex pages like these:
In 2014 Google started to use HTTPS as a ranking signal. HTTPS can also help make your site more secure and is required if you accept payments on your site.
You can purchase an SSL certificate from many places. You can also get a free one from Let’s Encrypt. Setting up an SSL certificate manually is not a simple task. For that reason, I recommend you go with a host that offers to set it up for you such as WP Engine or SiteGround. They make the process much easier since it’s basically automated and if you encounter any issues you can contact their support team for help.
Once you set up an SSL certificate don’t forget to take the following steps:
Your hosting service may have some HTTPS configurations that need to be set up. For example, if you use WP Engine, make sure to check all the boxes in their SSL settings for both versions of the domain; www and non-www. There are a few settings I recommending reviewing in the screenshot below if you are using WP Engine.
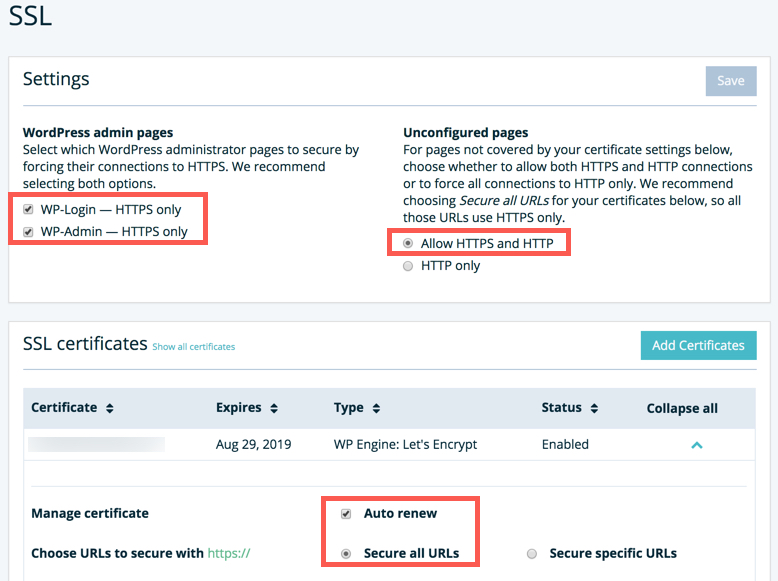
Note: Do not use any type of Force SSL plugins if the site is hosted at WP Engine. Reference: https://wpengine.com/support/securing-all-urls-with-ssl/
You’ll also want to make sure that your WordPress settings are correct now that you’ve installed an SSL certificate on the site.
In WordPress, go to the “Settings” tab and then click on “General”. Make sure the “WordPress” address and “Site Address” both include the https:// version of the site.
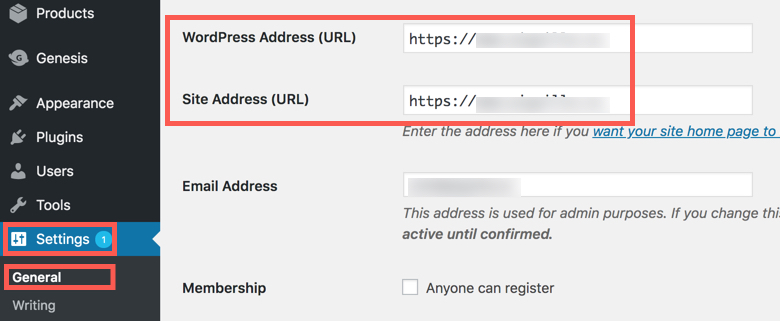
Some hosts will lock this area and it will appear “grayed-out” and not let you edit it. I believe you can contact the host for help or update the wp-config.php file to fix this.
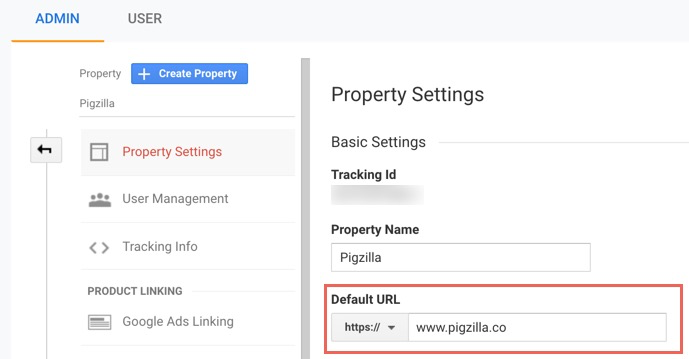
In Google Analytics, you will want to review the “Default URL” in the Property Settings and in the View Settings. If there are multiple “Views” in the View Settings, you will want to review all of them.

Inside the Property Settings and View Settings in Google Analytics you can see which version of the URL is being tracked. Make sure it’s set to the new https:// version.
If you make any changes here, I highly recommend viewing live traffic data in Google’s “Realtime” report to make sure Google Analytics is still tracking properly.
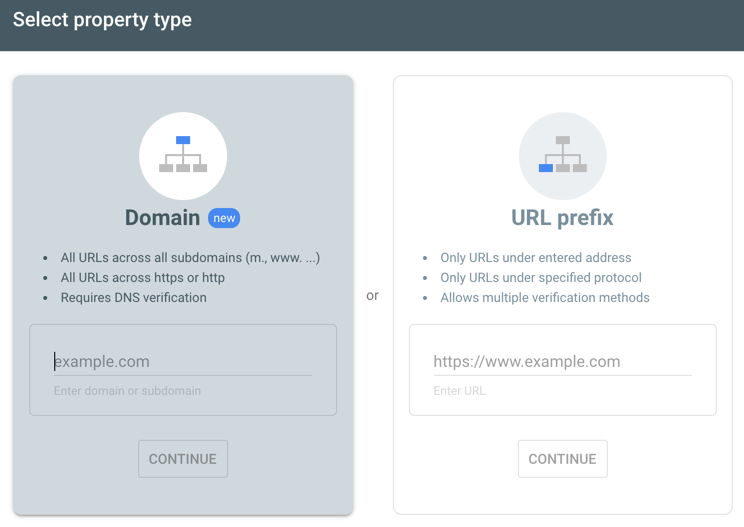
This one is also very important. If you have set up Google Search Console by verifying individual properties (aka URL Prefix), then you will need to make sure to verify the two new versions of the domain; both https:// and https://www.
If you have set up Google Search Console by verifying the entire domain, then this section does not apply to you.
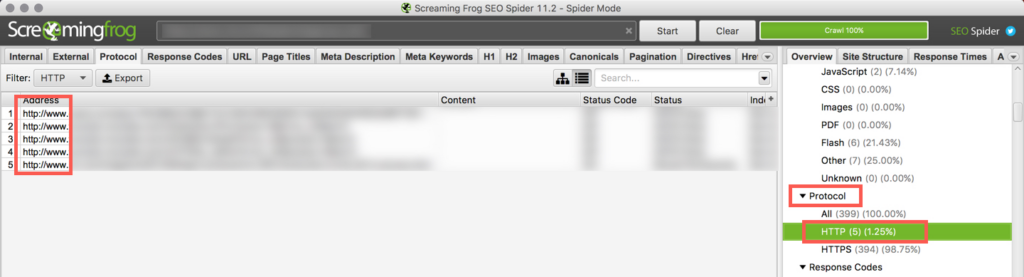
Crawl the site with the software of your choice. I use Screaming Frog to make sure all internal links on the site are now HTTPS.
In Screaming Frog, under the “Protocol” section, click on the “HTTP” tab to see any internal links on the site that are still HTTP.
You can use a Search and Replace plugin to update HTTP links in bulk. But be very careful. It’s super easy to mess things up using a search and replace plugin.
It’s crucial that Google can find all the pages on your site that you want indexed. Just because a page exists does not mean Google can find it. If it’s not linked to on your site from a page Google knows about, Google may not be able to find it. That’s why an XML sitemap is used. It contains a list of all pages on your site that you want Google to crawl and index.
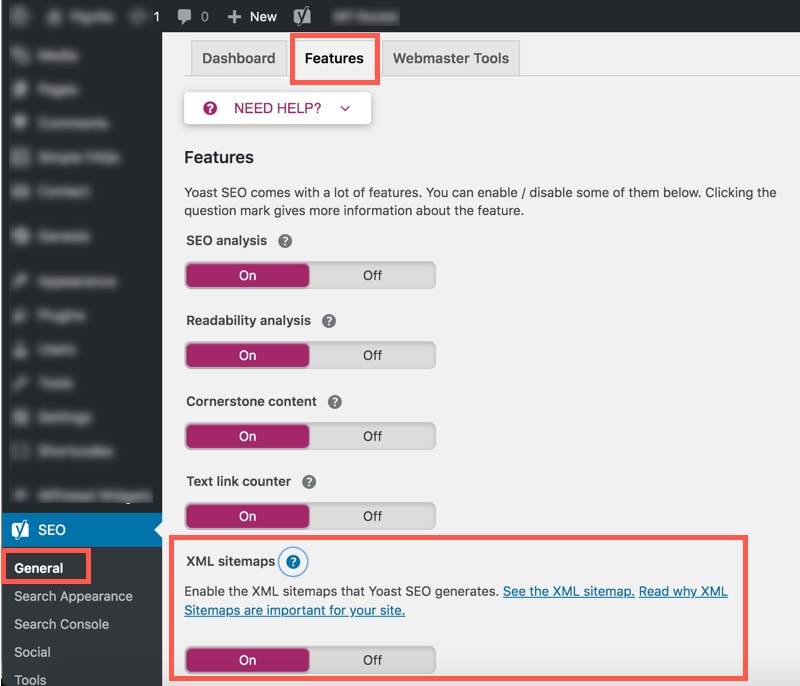
There are many tools you can use to create an XML sitemap. I love using Yoast’s free SEO plugin for this.
Once you have installed the plugin and configured it, you can confirm the XML sitemap feature is on by going to the “General” tab and then the “Features” tab. You can also view the XML sitemap here.
It can also be found by adding /sitemap_index.xml to the end of your home page URL.
Example: https://whitespark.ca/sitemap_index.xml
On individual pages, you can control whether or not Google will index a page. When editing a page, scroll down to the “Yoast SEO” section. Under the “Advanced” section you can choose either “Yes” or “No” to “Allow search engines to show this Page in search results?”
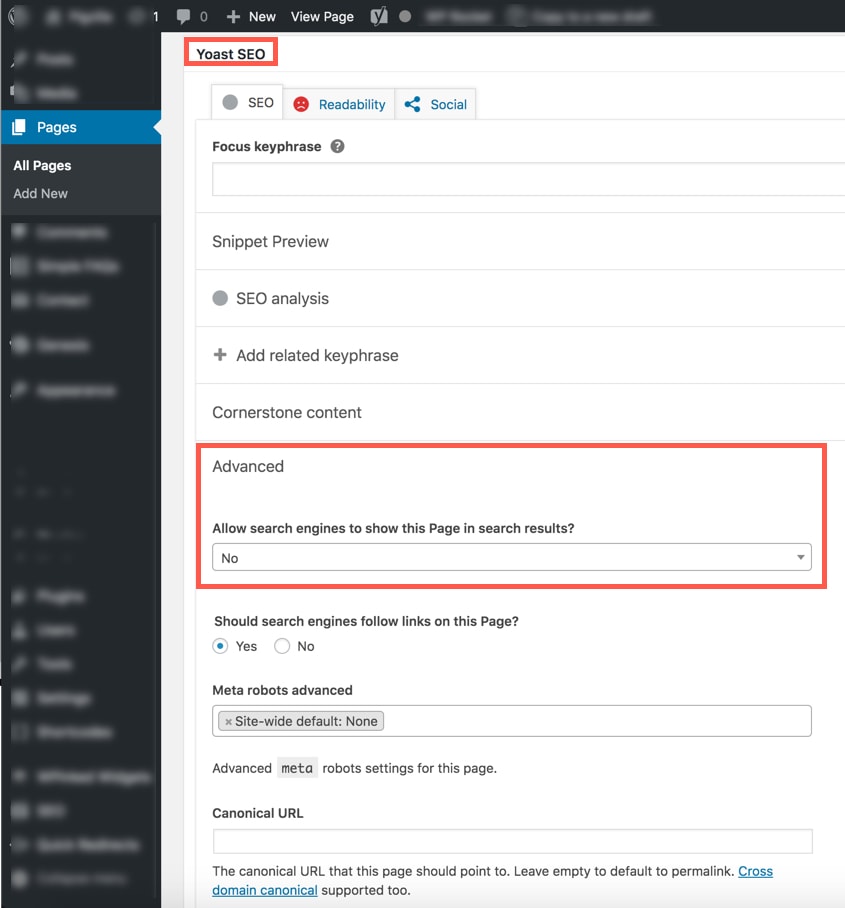
If you choose “No”, Yoast will add the noindex meta tag to the page like so:
<meta name=”robots” content=”noindex, follow”>
If you use the Yoast SEO plugin to noindex a page, it will automatically be removed from the XML Sitemap.
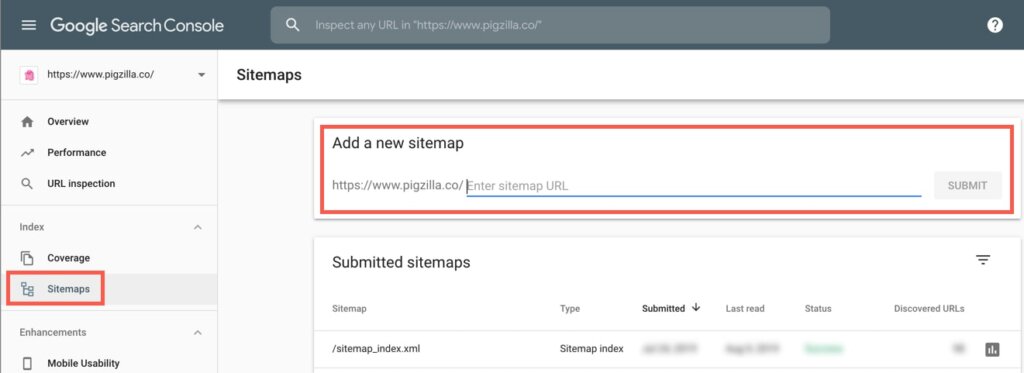
After you have created your XML sitemap you’ll need to submit it to Google in Google Search Console.
In Google Search Console, click on the “Sitemaps” tab. In the “Add a new sitemap” area, add the XML Sitemap path. Most likely this will be sitemap_index.xml or sitemap.xml.
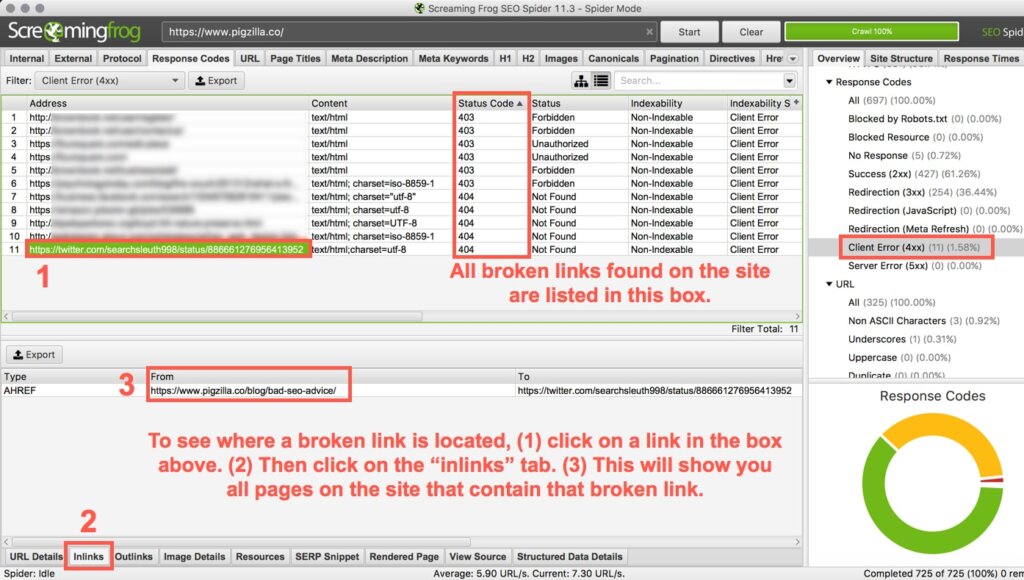
For a good user experience and for crawling efficiency, you’ll want to make sure to fix any broken links on your website.
In Screaming Frog, click on the “Response Codes” tab. In the “Overview” tab on the right, click on “Client Error (4XX)”. This will pull up a list of all pages that have 4XX errors. You can see the “Status Code” column to see which ones are 404s (broken links).
1) Click on a broken link in the main box.
2) Then click on the “Inlinks” tab at the bottom (you may have to drag up in order to see this section).
3) This will show you all the pages on the site that contain that specific broken link. These are the pages you will need to go to in order to fix the broken link.
You can use a Search and Replace plugin to update broken links in bulk. But be very careful. It’s super easy to mess things up using a search and replace plugin.
If there are too many internal redirects on your site it can take a toll on the server. It can also slow down page load speed. This can become an even bigger issue if there are many redirects and many users on the site at the same time.
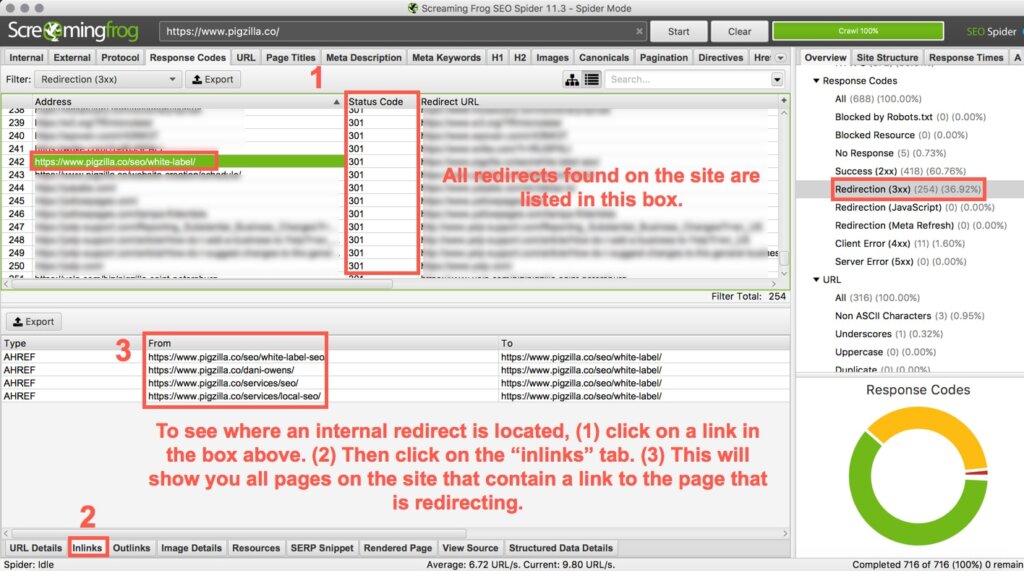
You can find all the internal redirects that are happening on your site by using a crawling software.
In Screaming Frog, click on the “Response Codes” tab. In the “Overview” tab on the right, click on “Redirection (3XX)”. This will pull up a list of all pages that have 3XX redirects. You can see the “Status Code” column to see which ones are 301s and 302s (redirects).
1) Click on a link that is redirecting in the main box.
2) Then click on the “Inlinks” tab at the bottom (you may have to drag up in order to see this section).
3) This will show you all the pages on the site that contain that link that is redirecting. These are the pages you will need to go to in order to update the internal links so that they no longer redirect.
You will only need to be concerned with internal links that are redirecting.
Now that you have located the internal link that is redirecting, you can update it to the correct / final destination link.
In the example above you will see the link /seo/white-label/ is redirecting. Let’s see why this may be:
The main goal is to update the link so that it no longer redirects. Even once you update the link, you’ll still want to keep the 301 redirect in place just in case there are any backlinks to the old link anywhere on the internet.
You can use a Search and Replace plugin to update internal redirects in bulk. But be very careful. It’s super easy to mess things up using a search and replace plugin.
Whew! That’s a lot of information. But it’s all very important for local SEO. On their own, each issue may not be a big deal but when you add them all up, they have a large impact.
A quick recap:
We’re making it really easy for you to implement everything covered in A Beginner’s Guide to Technical SEO For Local Businesses and to have a reference source. Simply click here to download the PDF version with all 3 parts.
Looking to expand your SEO knowledge? You’re in luck, Dani Owens offers SEO Training to agencies, freelancers and DIYers. Check out her website for more information.


Whitespark provides powerful software and expert services to help businesses and agencies drive more leads through local search.
Founded in 2005 in Edmonton, Alberta, Canada, we initially offered web design and SEO services to local businesses. While we still work closely with many clients locally, we have successfully grown over the past 20 years to support over 100,000 enterprises, agencies, and small businesses globally with our cutting-edge software and services.